Wednesday, September 16, 2015

Slow Cooker Beef Stroganoff

I have officially started doing the crockpot like twice a week. I think I will call myself a CROCKSTAR! :) Seems fitting....
Its just too easy, using the slow cooker or "crockpot." I usually have the crockpot liners but recently its been an extra expense, so its been looked over a lot. But I highly recommend getting them if you happen to see them and want to try them out. No mess! (or hardly one at all) I'm in!!!

So I am usually feeding 4-5 people who usually go back for seconds so this meal really goes a long way for your dollar. I truly appreciate the value a cheap meal that's quick but still somewhat healthy.
I steam some frozen green beans to throw on the side and toast up some garlic bread for a nice CRUNCH! Easy to cook up and Easy to clean up! That's my kind of Wednesday night!! 


Ingredients:

2 lbs. beef stir fry strips or cubed stew meat
1 can Cream of Mushroom
1 can Cream of Golden Mushroom
1 Large onion or two small ones, chopped
2 TBS Worcestershire sauce
1/2 cup beef stock or water
1 cup sour cream
Salt and Pepper


Directions:

In the slow cooker, spray lightly with olive oil. Salt and Pepper your beef and throw into crockpot.

In a large bowl mix together your soups, onion, Worcestershire sauce, and stock or water. Pour on top of your beef. Mix well with a large spoon so all strips are covered. 


Cook on LOW for 6 hours.

Add 1 cup of sour cream and mix well. Put lid back on and leave for 30 minutes.

In the 30 minute wait for the sour cream to blend well, you can boil your egg noodles. Drain. and then add to your crockpot. Mix well! 
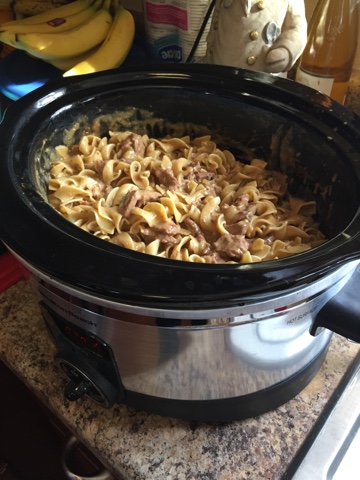

Enjoy!!!! 


Garlic toast before it was "toasted" 

5-6 slices of bread 
Butter 
Minced garlic 

Pop in oven under broiler for 5 minutes. 

Thursday, September 3, 2015

Italian Cloud Cookies-Vanilla Bean Icing

I've mentioned before how I have and will always continue to have a sweet tooth. Its terrible, blah blah, YOLO. Yes I said YOLO :) And sweets are just something I am not willing to give up....Its for the benefit of the ones around me, truly. It keeps me sane to bake sweets and consume them. :) Okay. So now that we've clearly went over that again I can move on to sharing this recipe...It's a true TREAT!
Italian Cloud Cookies with a Vanilla Bean Icing!

My husband and his family owned a pizzeria for about 14 years and my sister in law, Kelley took care of all the sweets. She makes some amazing cupcakes and did personal orders all the time. Plus had a variety at the dessert bar for you to choose from. I love cupcakes but sometimes I'd like a cookie....I've always loved cookies and baking them so I decided to try out a few cookie recipes and put them out at the dessert bar along with cupcakes. I did Chocolate Chip, Peanut Butter, Monster cookies etc. but really wanted to do an Italian staple that customers might enjoy. So, the Italian Cloud Cookie was born :) It became a request more than any other cookie I had ever made, even by my husband and mother in law. I knew this recipe was a true winner and would be one that would definitely stick around. Its a lot like a sugar cookie but very small, soft, moist, fluffy, and lightly sweetened cookie that melts in your mouth.
........................The secret ingredient.....RICOTTA CHEESE!


Ingredients:

~1 cup butter ( yup, 2 sticks ) softened
~2 cups granulated sugar
~2 eggs
~15 oz. Ricotta cheese
~1 teaspoon almond extract
~4 cups AP flour
~2 teaspoons baking powder
~1 teaspoon salt

Icing:

~1 1/2 cup powdered sugar
~3 tablespoons milk or heavy cream
~Caviar of one vanilla bean pod


DIRECTIONS:

Preheat oven to 350 degrees.

In a bowl of an electric mixer cream together butter, sugar, eggs on medium speed.

Add Ricotta cheese and mix until smooth. Add Almond extract, mix again.

In a medium bowl mix your 4 cups of AP flour with baking soda and salt.

Gradually add the flour mixture to wet ingredients on low until the dough forms. It will be a tad sticky.

Drop the dough by small level spoonfuls onto a baking sheet covered with foil or parchment paper. Bake for 12 minutes. Cookies will just be started to get golden brown on top and bottom edges.

Remove from baking sheet and cool on wire rack. When cooled, drizzle your icing on top and allow icing to fully set before storing.


ICING DIRECTIONS:

In a bowl, whisk together the powdered sugar and milk. Then add your caviar from vanilla bean. Stir well! 


Funny, looks like a biscuit with gravy on it

Monday, July 27, 2015

Lime and Coconut "poke cake"

Nothing better than the smell and taste of lime & toasted coconut to screeeeam  Summer Time!  
My mother is in town visiting for a few weeks and I always love to bake a few special things. This recipe was a new one but definitely one that aims to please (my mother) 😊 okay so if you are not familiar with what a "poke cake" is....I'm worried for you ! No just kidding....I'm sure lots of people haven't heard of a "poke cake."  .....I've never met anyone who hasn't lol but, maybe you have. It's basically a cake that you've baked, cooled....then you poke holes into and pour either jello or pudding onto it (into the holes) This cake does take some time, only because you need to refrigerate the cake after the jello or pudding step. It's WORTH IT. Alright well, let's get to it. 

You will need all the ingredients below. Plus a 13X9 glass dish 

So you will need to prepare the boxed cake mix as it says...I swapped the vegetable oil with coconut oil. Lighter and gives you more of a coconut flavor boost.....
While the cake is cooling you will want to start preparing jello as it says on the box. Set aside ....
Poke all the holes into the cake you'd like. I used a large fork and tried not to go through to the bottom. 

Then pour your jello mixture on top of cake letting it seap into all the holes. 


As you can see I've zested half a lime on top as well. Just gives it a nice zing. 😊 wrap with foil or press and seal and refrigerate for at least two hours.

While your oven is still kind of hot still ..turn it back on... Set it 400 degrees. 

Grab your bag of coconut and spread half of the bag on a foil lined cookie sheet. Put in the oven for about 10-12 minutes. WATCH !! Because you can burn coconut, quickly. But ohhhh the aroma that takes over the house. Wow. I dare you not to eat any. Ha!!!! 


When your cake has been refrigerated for at least two hours, pull it out. Empty your cool whip into a bowl and zest more of your lime into it. Mix together. Plus squeeze a little lime juice in as well....
Spread evenly over cake. 
Sprinkle the rest of the UNtoasted  coconut first evenly over the cake, then sprinkle toasted coconut last. 
Should look a little like this beauty here -
 
This cake was so light, so fluffy and so moist! It seriously is a pure taste of summer and will satisfy any sweet tooth. Lime and Coconut --a perfect combo. 


Wednesday, June 24, 2015

One Pot Pasta

Every time I ask the kids, "what do you guys want for dinner." They always say, "that one pot pasta!" It never fails. Tell you the truth I got sick of it and told them that it was off the menu for awhile! Yeah, I have that kind of power ! :) ha! 
So, it's Sophia's birthday today. Sweet Sixteen! And I ask her what she wants for her birthday dinner since they all were staying the night ...of course, she says "one pot pasta!" 
Ok.....
Sure! 
Now, this is pretty much a straight up vegetarian meal but we always throw some protein on the side. Always! Usually chicken is the easiest thing to grab and the easiest on your pocket. But tonight...oh tonight, it's a special night. We have a fresh market here in Omaha that's TO DIE FOR! They get things flown in straight off the gulf, DAILY. YUM. So we decided to splurge a little and get some sea scallops AND fresh shrimp. My eyes perked up quickly when my husband mentioned going there today. Not argument here. Unfortunately, no pictures were taken of either due to the fact that everyone was starving and I'm feeding a tired, hungry 11 month old in her high chair. I soooooo wish I had a third hand!!!! So you'll have to just trust me on this one. First time cooking scallops too. Dang it !!!!! 
Anyways, this meal is always always always a HIT! And it's so easy. It's up to you what you want to put on the side....if you want to put anything at all. ....it could be a large salad with your favorite toppings and dressings to fresh shrimp and scallops like I did tonight. Or how about a fresh hot loaf of sourdough ... Ahhhhhh. It's endless. 
Without further or do...the easiest recipe in the world ! 
Combine all of the ingredients above. To be clear...there's a pound and a half of linguine, 1 cup of cherry tomatoes, 1 sweet onion thinly sliced, 3 cloves of garlic thinly sliced, fresh basil, 1/2 tsp of red pepper flakes, salt, and pepper and a good glug of olive oil. :) 
Fill your pot with water just so that all the ingredients are covered. Turn burner on high, and boil for 8 minutes or until most of the liquid has been absorbed. Remove from heat and serve immediately in your favorite bowl. Sprinkle with Parmesan and more basil if you desire. My favorite part about this recipe is you're a tomato lover is that these little tomatoes burst and their precious little juices become one with binding of this pasta. It's seriously flavorful to say the least. Dont be afraid of the salt and pepper either in this dish. It needs it. 
I really have to thank Martha Stewart for this recipe. It's pretty genius. And considered a staple in this family now. 

Wednesday, May 6, 2015

Butterscotch Cinnamon Pecan Swirl Cake

Holy Moly! If this doesn't sweeten up your hump day I don't know what will. Seriously. This recipe should be a deadly sin! I found this recipe at: 
I wanted cinnamon rolls but I didn't want to have to roll it or wait for the dough to rise....I just wasn't In the mood. But still my craving existed. Anyone who knows me well, knows I have THE biggest sweet tooth. It's no joke. I DONT mess around. :)  Boy, did this recipe hit the spot though. I never said it was healthy or anything though. That's why I mentioned earlier it being a deadly sin! 
So, I changed a few things about this recipe, of course to "make it my own." You should try and let me know how it turns out. :) bonus you don't even have to pull out your mixer! 


Cake batter
3 cups AP flour (I used organic) 
4 tsp baking powder 
1/2 tsp salt 
1/2 cup brown sugar or 1 cup white granulated sugar 
1 1/2 cups milk (I used organic) 
2 tsp vanilla extract 
2 eggs (I used organic) 
1/2 cup butter, melted (I used organic) 

Topping
1 cup brown sugar 
2 tbs butterscotch pudding (3.5 oz box will do just measure out what you need) 
P.s. You could add any pudding mix, chocolate, white chocolate, lemon ? It's endless. 
2 TBS AP flour
1 tsp cinnamon 
1 cup butter softened (almost melted)
1/4 cup chopped pecans 

Sweet Glaze  
1 cup powdered sugar 
2 TBS Milk or heavy cream 
Splash of vanilla extract 

Directions: 
Preheat oven to 350 degrees. 
Mix all cake batter ingredients, EXCEPT for the butter!!! 
Slowly add butter in until well combined. 
Pour into a greased 13X9 baking dish. 
Mix together all the topping ingredients until well combined. 
Spoon the topping onto cake batter in Globs then swirl into cake with a butter knife. 
Bake at 350 degrees for 25-30 minutes or until fully baked through. I wouldn't exceed 35 minutes. 
Mix together your sweet glaze ingredients. Set aside until cake is done. 
Let cake cool for 10 minutes. 
I used a fork and just drizzled the glaze over top the cake... Perfection in its finest form. 


Wednesday, April 29, 2015

Roasted Vegetable Salsa

My favorite time of year is in full flourish. Fresh fruits and veggies are becoming more and more available. I watch Racheal Ray a lot. She's on at 9am and I'm up about 8 am with the little one. But she fascinates me all the time with her tips and tricks. Smart smart lady! I saw one episode last week where she made a chunky guacamole with tomatoes onion cilantro...the whole nine yards but she threw all the vegetables plus the avocado halves on her grill just to get those awesome beautiful black marks you see when you pull em' off the grill, not to mention the irresistible smoky flavor the veggies absorb ....wow. Yummy. Genius! Guaranteed it's a little more work than your normal side dish but I think it'd be well worth it.
I love salsa! I recently found out I love avacado. Not guacamole, just sliced avacado. I've made my kind of salsa many many times. Kids love it, the husband loves it but sometimes it can be super raw tasting...you know what I mean, like so fresh it's raw tasting and you can basically taste all the acidity from the veggies and nothing else. Usually the onion will overpower the tomato for me. Because we love our onion.....but why not roast all the veggies, first in the oven (since I don't have a grill) ??? I mean duh. Right? So I looked around on Pinterest a bit to see what other people were saying on this particular way of making salsa. Needless to say I'm way behind after finally making my salsa this way. Above average ! 

Ingredients:
1 sweet onion 
4 medium to large tomatoes 
4 garlic cloves (or more if you like) 
1 jalapeño-seeds removed if you want just flavor and not heat. 
Bunch of cilantro 
1/2 tsp cumin
1 lime 
Olive oil 

Preheat your oven to 450 degrees. You want it nice and hot! Wash your veggies and split the tomatoes a little to breath. Rub all the veggies with olive oil and put on a cookie sheet covered with foil. Sprinkle with salt. 


Roast for 15 min or until soft and lightly charred. 


Let the rest for 10 min and you'll be able to peel back the skins. Remove skins for both tomato and jalapeño. 

Place all ingredients in a food processor toss in your fresh cilantro, cumin, salt, pepper, and lime juice. 

Pulse until it meets your favorite consistancy !! Refrigerate and let those flavors BLEND! 


Thursday, March 26, 2015

Cilantro, Lime, Black Bean & Sweet Corn Basmati


It seems like their are so many types of rice out there these days....brown, white, jasmine, basmati, wild rice ....the list goes on quite a bit. My personal favorite BASMATI !!! So light, so tender, yet gritty and super delicious. If you haven't tried it yet. Do it! Salt, pepper and butter...that's all you'll ever need.....except when you have Mexican night and you want to vamp things up a little and leave out your traditional Spanish rice. :) this is exactly what this recipe is all about. Simplicity in its finest form. 

Ingredients:
1 TBS butter 
1-2 cups basmati rice
(I used 2 pkgs of boil in a bag boxed rice) 
1-2 TBS fresh lime juice 
3/4 cup fresh cilantro 
1 can sweet corn 
1 can black beans 
Salt and pepper to taste 

Directions: 
Boil your rice in hot water for the amount of time directed on box or container. 
In the meantime open your can of corn and black beans....rinse your beans under cold water. Mix corn and black beans together then set aside. Chop fresh cilantro and cut your lime in half then set aside. 

When your rice is completely cooked, pour into your favorite bowl. Add your butter, corn and black beans, cilantro, and lime juice. Add salt and pepper. Stir all together and serve along side your favorite Mexican dish....whew! That was easy! Olé! 


Monday, March 9, 2015

Baked Italian Chicken

I was on Pinterest the other day and I get a lot of my inspiration from there these days. I don't know about you guys but I certainly love fast and easy when it comes to cooking dinner. In my last blog post I explained how marrying into an Italian family will often makes its way onto the kitchen table 8 times out of 10. And most of those meals are more on the unhealthy side because bread and pasta are usually in the mix. 
My family loves chicken in just about every way you can cook, bake or fry it. I only purchase Smart Chicken or any chicken that's antibiotic and hormone free. There are a few good brands out there and yes they are more on the pricey side but so worth it. Although it's not a MUST to complete this recipe but I highly recommend it. 

Ingredients:
Olive oil
Chicken breasts(I purchased 4 lg breasts)
Jar of pre made Pesto
2 or 3 large vine ripe tomatoes 
Big block of Mozzarella or 1 lg package of shredded mozzarella 

Directions:
-Preheat your oven to 400 degrees
-Place your chicken breasts in a 9X13 glass dish, sprinkle with Salt...Pepper
-Slather pesto liberally on top of each chicken breast 
-top with two thick slices of tomato 
-top with freshly shredded mozzarella 


Drizzle with a little olive oil and bake in oven for 30 minutes, or until chicken juices run clear and no longer pink.


Wow! The mozzarella just covers everything like a blanket!! And the pesto just Marrys all the flavors together. Seriously, sooooo easy and so quick!!! 
I decided to serve some roasted potatoes on the side. Totally up to you on what side you would like to pair with this.  A nice salad...whatever is up your alley ! 
Buon Appetito! 


Saturday, February 28, 2015

Baked Shells, Pesto, And Meat Sauce

Marrying into an Italian family, my husband will always request a baked pasta of some sort. This recipe is always a winner whether it's a night you have some company over or just a family night in with the kids. 
If your boyfriend/husband is anything like mine he wants double the meat in whatever the meal is. In this case I used a ground mild Italian sausage and ground beef. The sausage is a must for that Italian taste that you crave in a dish like this one. Effortless flavor! 
Now you can make your own tomato sauce if ya like but i happen to be pretty fond of Prego myself lol! I buy the BIG jar and it's perfect for this meal. Same with the pesto. All store bought. Quick, easy and just as yummy. You also can use any favorite cheese of your choice. I used mozzarella and Parmesan. I know usually it's easier and quicker to buy the packaged shredded cheese and go on....but I highly recommend buying a mozzarella and Parmesan block and grate your own cheese. It really puts this dish on a whole other level!!!! Something about freshly grated cheese people!!! It's a weakness of mine. Hope you guys enjoy! 

Ingredients: 

1 tbsp olive oil 
1 small sweet onion
6-7 large basil leaves or 1 Tbs dried basil
1 lb ground beef
1 lb mild Italian sausage 
1 BIG jar of Prego (flavored with meat) 
1/4 cup store bought Pesto 
1 lb dry pasta shells 
1 1/2 cups fresh mozzarella cheese
1/2 cup Parmesan cheese

-preheat oven to 400 degrees 
-Start by adding oil to your pan and chopping your onion. Toss in a pre heated skillet. Sautée just until tender. Brown your beef/sausage with onion until no longer pink...and drain. 
-Return to stove and add the full jar of Prego. Turn heat to med low. Chop Basil leaves or add dried basil to skillet and stir. 
-Boil your pasta shells in a pot with boiling water and a pinch of salt for 9 minutes (al-dente) ...drain. Add back to the pot pasta was cooked in. 
-Your meat sauce should now by warm so now add your 1/4 cup Pesto and stir well. Pour into the pot of cooked shells. Gently toss. 
-Pour half of the pasta mix in a 13X9 casserole dish. Sprinkle with half of the  fresh mozzarella and Parmesan. 
-Pour remaining pasta mix in dish and top it off with more mozzarella and Parmesan
-Pop in the oven for 15 minutes or until the cheese is completely melted and bubbly with a slight browning! 


I served a cucumber and tomato salad on the side with some Italian dressing. You could roast some broccili or add whatever vegetable you might like to get your greens in. Happy to share ! 

If any one has any suggestions or comments feel free to leave them. Much love to all of you ....